
Deleting All Your FB Alerts: A Step-by-Step Guide

Deleting All Your FB Alerts: A Step-by-Step Guide
Facebook has developed a reputation for spamming users. The smartphone app bombards you with alerts. Dozens of emails arrive every day. And every time you log into the web app, you’re sure to see lots of new notifications.
Fortunately, it doesn’t have to be this way. If you want to know how to delete Facebook notifications, how to clear notifications on Facebook, or how to turn off Facebook notifications completely, here’s what you need to know.
How to Delete Facebook Notifications
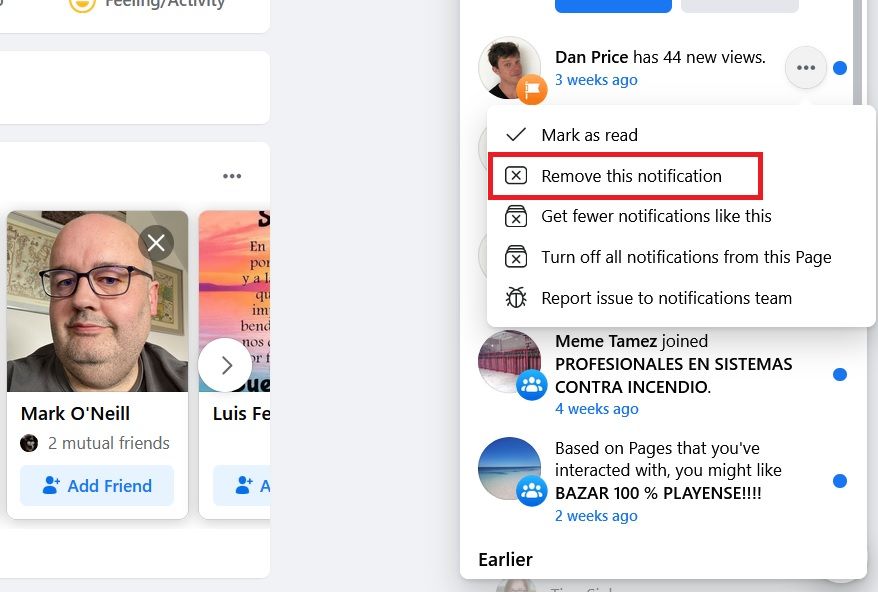
Let’s start with the most important question: How do you delete notifications on Facebook?
If you want to remove a Facebook notification on the web app, follow the step-by-step instructions below:
- Navigate toFacebook.com and log into your account.
- Click on theNotifications bell in the upper right-hand corner.
- Find the notification that you want to hide.
- Click on thethree horizontal dots alongside the notification you want to delete.
- SelectRemove this notification .
The process to delete Facebook notifications on the smartphone app is similar. Just fire up the app and tap on theNotifications tab. Once you’ve found the alert you want to get rid of, tap on the three dots and chooseRemove this notification .
How to Clear All Facebook Notifications
When you log into Facebook and see a pile of unread notifications, you’ll want to clear them as soon as possible. If you click on the bell icon, the unread notifications red dot disappears.
However, you haven’t really solved the problem. If you don’t clear the notifications, they will return as soon as you get a new alert. To permanently clear notifications on Facebook, you need to mark them all as read.
Weirdly, there is no way to clear your unread notifications from the smartphone app without clicking on each one. Instead, you need to perform the process from the web app.
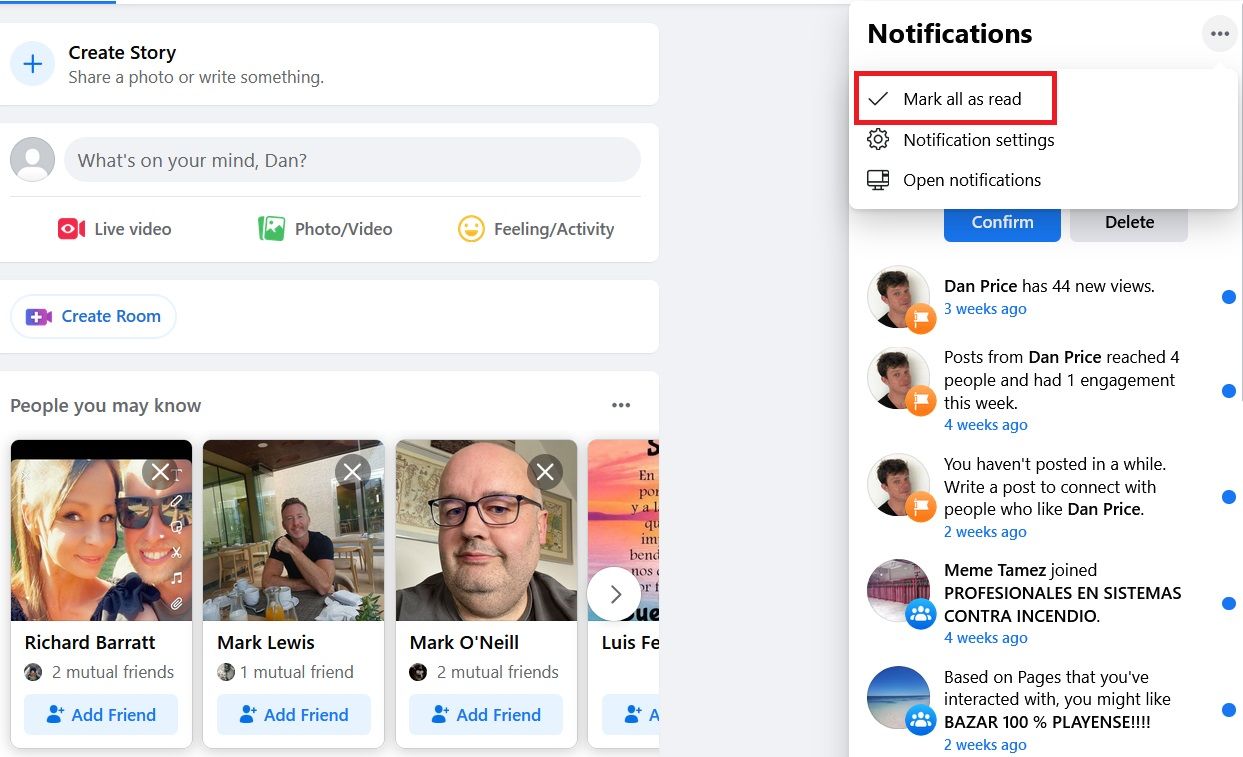
To mark all of your Facebook notifications as read, follow the guide below:
- Head toFacebook.com and log into your account.
- Click on theNotifications icon in the upper right-hand corner.
- Click on the three horizontal dots.
- SelectMark all as read .
How to Turn Off Facebook Notifications
Hopefully, the last two sections have helped you get your existing Facebook notifications under control. But that’s only half of the battle. You need to make sure you’re not getting pestered by all that notification spam in the future, otherwise, you’ll quickly end up back in the same position.
There are two ways to approach the problem. You can either turn off notifications for particular types of alerts as they arrive, or you can deploy a more holistic approach from Facebook’s Settings menu.
How to Turn Off Facebook Notifications as They Arrive
The process to turn off Facebook notifications as they arrive is similar to the process for deleting Facebook notifications.
Follow the steps below to learn about the process on the web app:
- TypeFacebook.com into your browser and log into your account.
- Click on theNotifications icon in the upper right-hand corner.
- Find a notification that you want to turn off.
- Click on thethree dots .
- SelectTurn off notifications of this type (the exact wording may change depending on the type of notification).
(Note: If you are disabling notifications from a page, you will also see an option toTurn off all notifications from this page .)
Smartphone users can see the same list of options by opening the app, tapping on theNotifications tab, and selecting the three dots alongside the notification in question.
How to Turn Off Facebook Notifications by Category
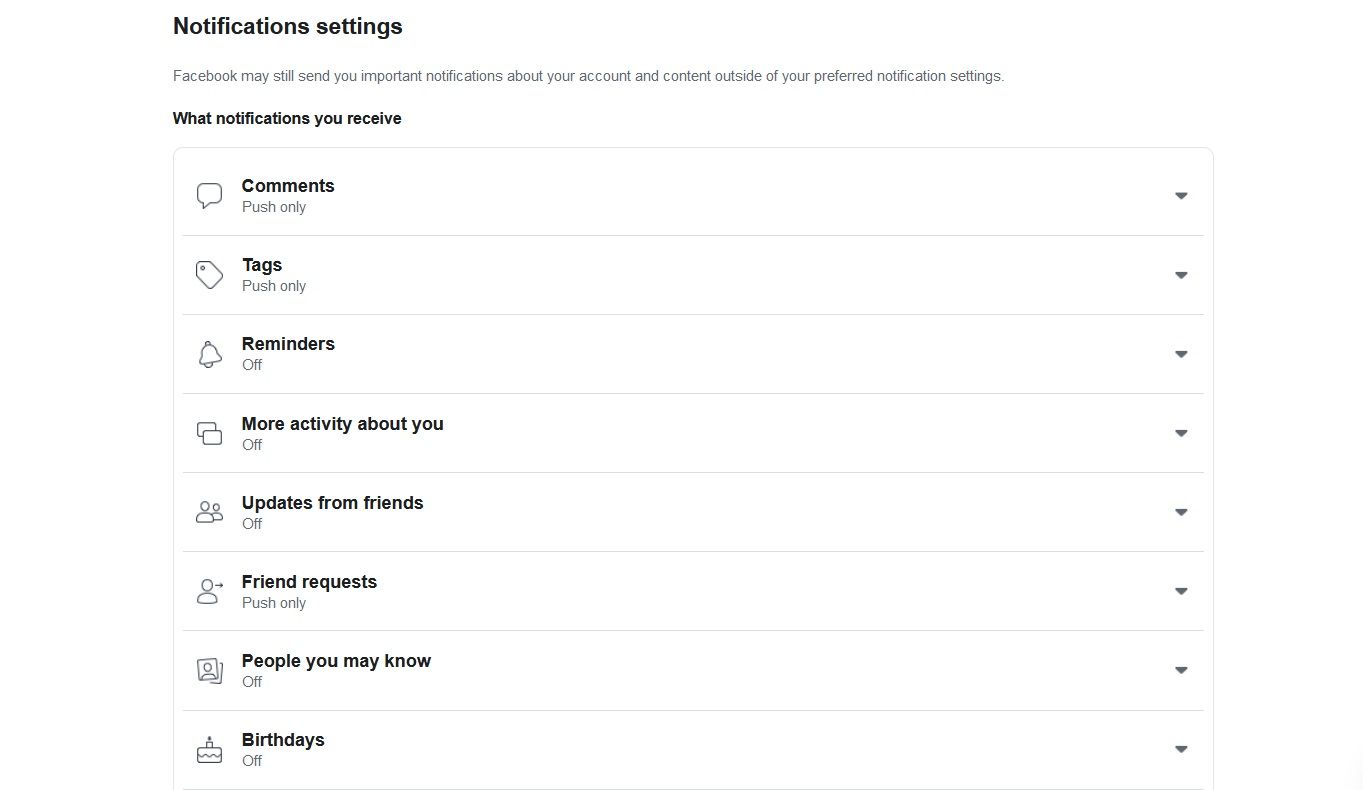
If you dig into the Facebook Settings menu, you can turn off notifications for each type of alert (e.g. birthdays, people you may know, events, pages you follow, etc).
You can also use the menu to re-enable a notification that you’d previously disabled using the first method we discussed.
To disable Facebook notifications by category, use these step-by-step instructions:
- Go toFacebook.com and log into your account.
- Click on the down arrow in the top right-hand corner.
- ChooseSettings and Privacy > Settings from the dropdown menu.
- In the panel on the left-hand side of the page, click onNotifications .
You’ll now see a list of all the different notification categories. To turn off a certain type of notification, expand the section, and make the changes you desire. You can turn off some notification categories with a simple toggle; others (such asGroups) give you control over email and SMS notifications, as well as granular control over which groups you want to disable specifically.
It’s also worth scrolling to the very bottom of the list to theHow you receive notifications section. In it, you can select which browser and email notifications you receive. You can choose to receive Facebook’s suggested notifications if can’t be bothered to customize everything—but it will probably still result in you getting too much spam.
How to Stop Facebook Notifications Altogether
You can’t disable all types of Facebook notifications in the web app, but you can stop Facebook notifications entirely on Android and iOS.
Remember—this is the nuclear option. You won’t receive alerts of any kind if you follow these instructions.
How to Stop Facebook Notifications on Android
Close
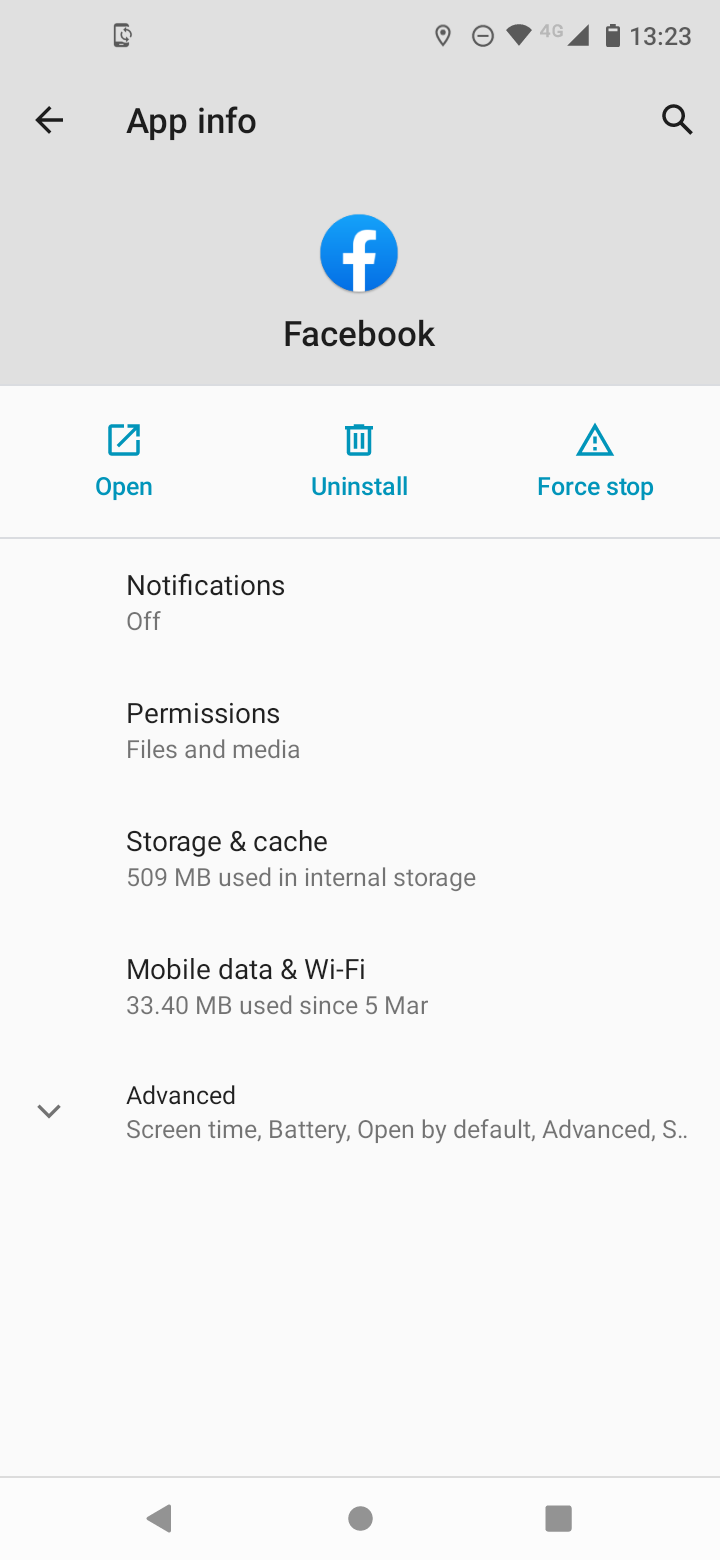
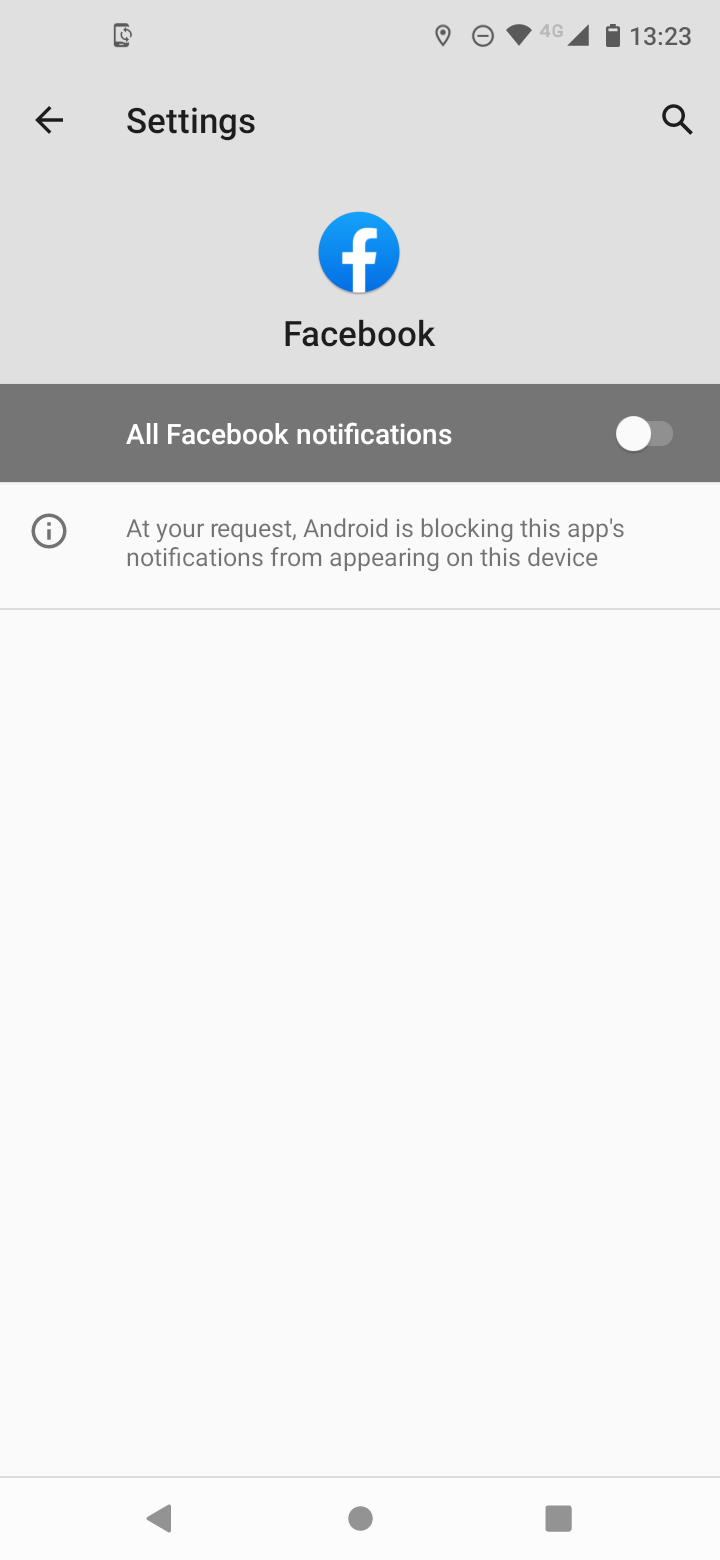
To completely stop Facebook notifications on Android, follow these steps:
- Open theSettings app on your Android device.
- SelectApps and Notifications .
- On the next window, tap onSee all apps .
- Scroll down toFacebook and tap on it.
- Tap onNotifications .
- Slide the toggle next toShow notifications into theOff position.
How to Stop Facebook Notifications on iOS
If you have an iOS device, follow these steps to stop Facebook notifications:
- Open theSettings app on your iPhone or iPad.
- SelectNotifications from the menu.
- Scroll down toFacebook and tap on the entry.
- At the top of the new window, slide the toggle next toAllow Notifications into theOff position.
More Ways to Make Facebook Work for You
Wrestling back control of your Facebook notifications is just one way to make Facebook work for you. Yes, there’s a little bit of micromanagement involved, but it’s worth the effort to ensure Facebook is more useful than annoying.
This holds true for a lot of the Facebook experience; the more time you put into customizing the app, the more enjoyable your experience will become.
Image Credit: jhansen2/Depositphotos
Also read:
- [New] 2024 Approved Engaging Audiences with Strategic Language Choices
- [New] 2024 Approved Pinnacle Performances in Figure Skate '22
- Enhance Your Apple Device Experience: A Comprehensive Tutorial for Installing Extra Ports on MacBook/iPad Pro by ZDNET
- Facebook Enables Oculus Go's Full Access: An Overview for Users
- From Recordings to Live Streaming on YouTube & Twitch with OBS
- Hassle-Free Ways to Remove FRP Lock on Realme 12 Pro 5G Phones with/without a PC
- In 2024, Pokemon Go No GPS Signal? Heres Every Possible Solution On Infinix Note 30 Pro | Dr.fone
- In 2024, Revolutionize Your Podcast Reach with Smart SEO
- Inhibit Friends Who Remain Undisclosed in FB
- Play Hard, Win Harder: The Ultimate List of iOS/Android Sports Titles
- Public Skepticism Grows: Large Tech Companies Losing Faith
- Secure Password Management: Preventing FB Account Breaches
- Strategic Planning for Your Facebook Image Overhaul
- Trapped in Online Purgatory? Discover Why
- Updated In 2024, Get in the Loop 10 Free Online Video Looping Websites
- Title: Deleting All Your FB Alerts: A Step-by-Step Guide
- Author: Michael
- Created at : 2025-01-09 16:35:37
- Updated at : 2025-01-12 18:53:31
- Link: https://facebook.techidaily.com/deleting-all-your-fb-alerts-a-step-by-step-guide/
- License: This work is licensed under CC BY-NC-SA 4.0.