Facebook Picture Control Guide: Mastering Privacy

Facebook Picture Control Guide: Mastering Privacy
So, you want to know how to sort out the privacy settings on your photos. As with everything regarding privacy on Facebook, the answer isn’t immediately obvious. Because that would be far too easy.
In this article, we’re going to look at why photo privacy matters, then explain how you can protect your images from the eyes of strangers.
Keep reading to learn everything you need to know about Facebook photo privacy settings…
Photo Privacy Is More Important Than You Think
Keeping your photographs private—or at least restricted to a small group of friends —is more important than you might think. And it’s not just because a creep from your old high school is still liking everything you post.
So, what are some of the pitfalls of having your photographs publicly accessible?
- Theft: No, we’re not talking about identity theft. Despite the scaremongering, that’s difficult to achieve with just a photo. We’re talking about a physical burglary at your house. A picture of you on a beach, or even at a local restaurant, informs a would-be criminal that you’re not at home.
- Personal Details: Is there a picture of your driving license on the table in the background? Have you left your email account logged in on your computer screen? Is your car’s license plate in the shot? Information like this is like gold dust to cyber-criminals.
- Location: Does your photo reveal where you are? If you’re at home, have you just revealed your home address to the world?
- Embarrassment: Has someone posted a snap of you in a compromising position? You probably don’t want your family or your boss to see it.
Facebook and Photo Privacy
Of course, the warnings above apply to all forms of social media. But in this article, we’re only going to focus on Facebook. How can you control who sees your photos on Facebook? Keep reading to find out.
1. Inline Privacy Controls

Let’s start at the very beginning. Even if the privacy of your old photos is a mess, it’s time to turn over a new leaf. So let’s make sure the privacy is correct for all your new photos going forward.
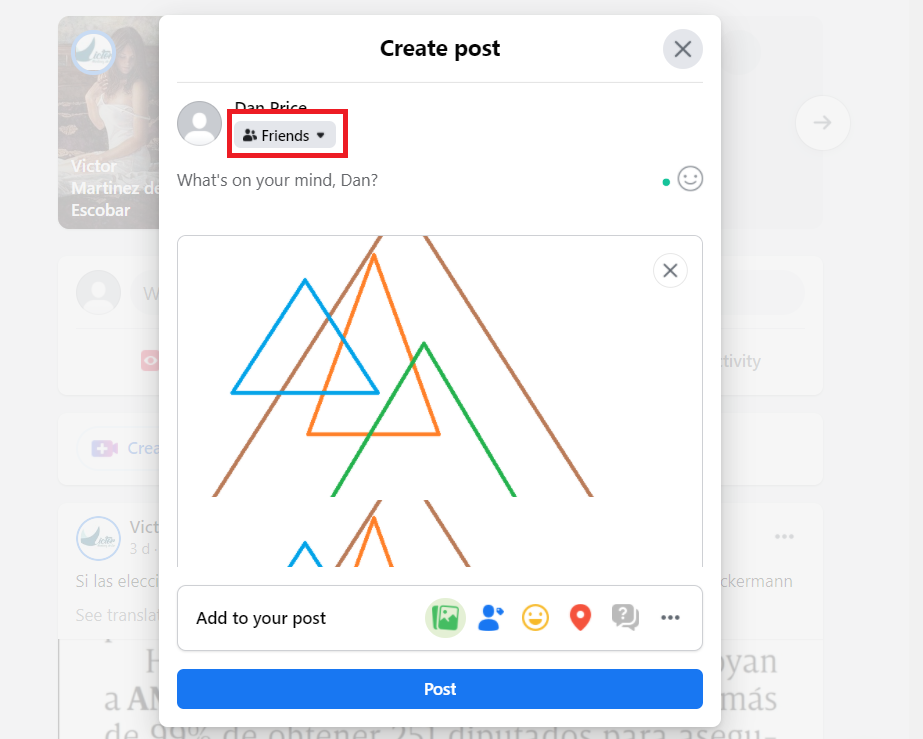
When you upload a new picture to Facebook, you can use the same privacy controls as you do for regular text posts. In the upper left-hand corner of the new post box, you’ll see a dropdown menu. This menu controls who can see the post.
You have six options to choose from:Public ,Friends ,Friends except (to exclude some people),Specific friends ,Only me , andCustom .
Make your selection, click onPhoto/Video to select your snap, then selectPost .
2. Old Photos
OK, so making sure your new photos are private is quite straightforward, but what about your old photos?Depending on your addiction level , we could be talking about thousands of images.
Luckily, it is possible to change the privacy level of your old snaps. You have three methods open to you:
Individual Photos: If you only want to modify the privacy setting of one photo, you need to locate the old Facebook post on your wall, in your Activity Log, or in your albums.
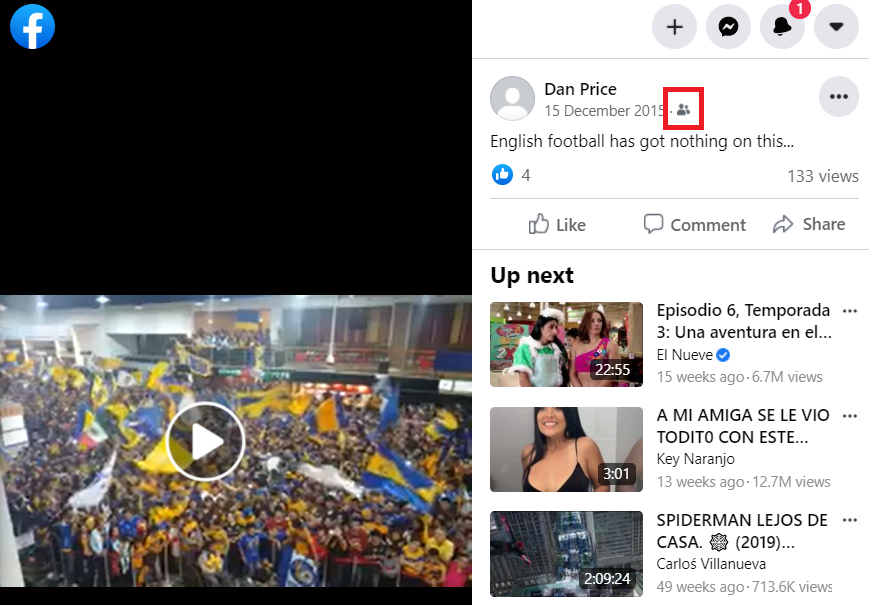
Open the photo, and in the upper right-hand corner, you’ll see the same dropdown menu as you see when setting inline privacy. Just choose your desired audience.
Albums: If you want to change the privacy of an album, navigate to your photos page from your profile and click onAlbums . Choose the album you want to alter, clickEdit , and choose your audience.
You can edit photos on a case-by-case basis in theProfile Pictures album, theCover Photos album, theMobile Uploads album, and theTimeline Photos album. However, other albums apply the same setting to all the photos within them.

WPS Office Premium ( File Recovery, Photo Scanning, Convert PDF)–Yearly

Restrict Access to Everything: If you’ve taken a laissez-faire approach to Facebook privacy in the past, you might have too many pictures and too many albums to use either of the above methods. In that case, it’s better to change the privacy settings of everything you’ve ever posted to the network.
This covers your photos, but also your videos, wall posts, comments, Likes, and other content.
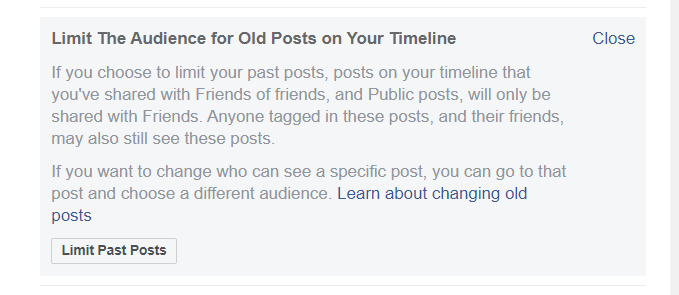
Go to Settings and Privacy > Privacy > Limit the audience for posts you’ve shared with friends of friends or Public and click onLimit past posts > Limit Old Posts to make the changes. Anything you have shared with friends of friends or the general public will change toFriends only . The changes cannot be undone.
Pro Tip: Use the Activity Log

For a quick way of seeing which photos are shared with the public, you can use the Activity Log. It’ll save you the time of trawling through endless albums.
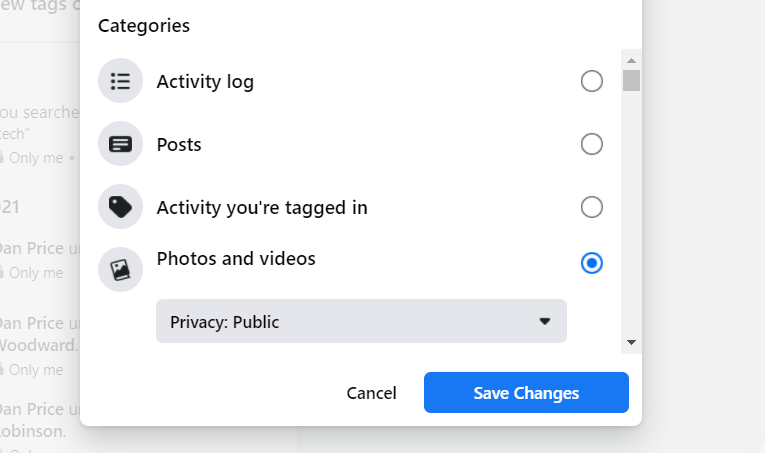
Click on theActivity Log link from your profile page, click on Filter, and select and selectPhotos and Videos in the pop-up box. Next, choosePublic in the drop-down box that appears.
Photos You’re Tagged In
Great, so that covers everything you’ve uploaded yourself, but what about photos of you that other people have uploaded? How can you make those private?
Well, you can’t. They’re not your photos, and you don’t have control over them. But you can untag yourself.
To remove a tag, navigate to the photo in question, click on the small arrow in the upper right-hand corner, and selectReport/Remove Tags . ClickUntag Photos to complete the process.
Unfortunately, the photo will still be visible to other users on Facebook. As long as the image does not break the network’s Statement of Rights and Responsibilities, there’s nothing you can do.
If you feel the image is abusive, you click on theReport link to let Facebook know. If the company agrees, it will remove the photo.
Tag Suggestions

You can’t prevent other people from tagging you in photos, but you can stop your name from being shown to them when they upload a photo. It means when someone uploads a photo, Facebook will not suggest your name to them as a recommended tag, even if it recognizes that the image looks like you.
In the latest version of Facebook, you need to disable the face recognition feature to prevent the suggestions from appearing. Go toSettings and Privacy > Settings > Face Recognition and make sure the setting displaysNo .
Does Facebook Photo Privacy Concern You?
We hope this article has made you realize photo privacy is important and helped you to understand the steps you can take to ensure images of you aren’t being exposed in the public realm. Because despite what tech companies would like you to believe, online privacy is important.
- Title: Facebook Picture Control Guide: Mastering Privacy
- Author: Michael
- Created at : 2024-07-29 07:30:03
- Updated at : 2024-07-30 07:30:03
- Link: https://facebook.techidaily.com/facebook-picture-control-guide-mastering-privacy/
- License: This work is licensed under CC BY-NC-SA 4.0.


